Github for babies
How not to be scared shell coding
If you are also in a coding occupation like me but get the mini panic attacks when someone mentions "bash commands" or "Linux" and don't know what the hell that Github app is - welcome this tutorial is for you!
What is Github
First things first let's start with by understanding what is Github and why you see every coder talk about it. In the most simplest words, Github is a version control tool - kinda like Google docs but for coders.
Imagine this - you and another coder are working on the same code file but own different aspects of the code. You both work started working on a code which had 10 lines initially but you deleted line 2 and added 3 new lines. Meanwhile your colleague changed line 3 and added some of his code. Now it's time to put the code together in one. But uh oh, your colleague will have completely different code file than you. You compare both the files manually and realise line 2 is missing in one code while line 3 has changed in another. But imagine doing this when there are thousands and thousands of lines of code!! That's not pratically possible That's where Git control comes in and solves this problem.
Getting started
Before we jump into the fun stuff - here's a quick overview of some common Git terminology
Repository - A repository is the most basic element of GitHub. They're easiest to imagine as a project's folder. A repository contains all of the project files (including documentation), and stores each file's revision history.
Branch - A branch is a parallel version of a repository. Think of it like a copy of your main branch or main code file. You can work freely in this branch without disrupting the "live" version. When you've made the changes you want to make, you can merge your branch back into the main branch.
Commit - A commit, or "revision", is an individual change to a file (or set of files). Think of it as pressing save. Commits usually contain a commit message which is a brief description of what changes were made.
Push - To push means to send changes made to your local code to a remote repository on GitHub.com. For instance, if you change something locally, you can push those changes so that others may access them. There are standard processes and commands to push changes and we'll go through them in the later section
Pull - Pull refers to when you are fetching in changes and merging them. For instance, if someone has edited the remote file you're both working on, you'll want to pull in those changes to your local copy so that it's up to date. See also fetch.
Merge - Merging takes the changes from one branch (in the same repository or from a fork), and applies them into another. This often happens as a "pull request" (which can be thought of as a request to merge), or via the command line
Learn more about Git terminology here
Creating your Git repository
Let's start with the simplest step - creating your Git repository. Typically you can create a online repository on Github.com and sync it to your local system. This way you can code in you local system and "push" the changes to remote. The remote repository will keep a history of changes and also alert you if files on local and remote don't match during push pull requests.
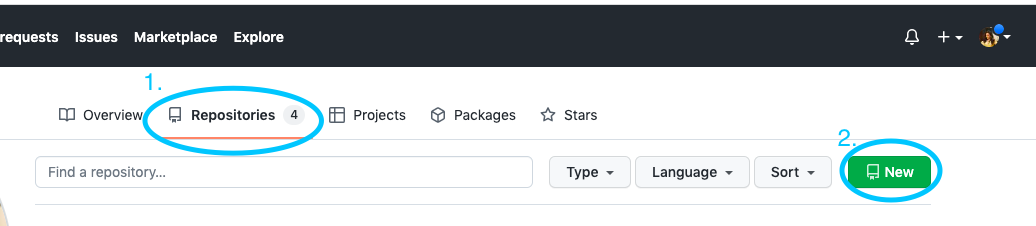
To create a remote repository go to the repositories tab on your dashboard and then click on new
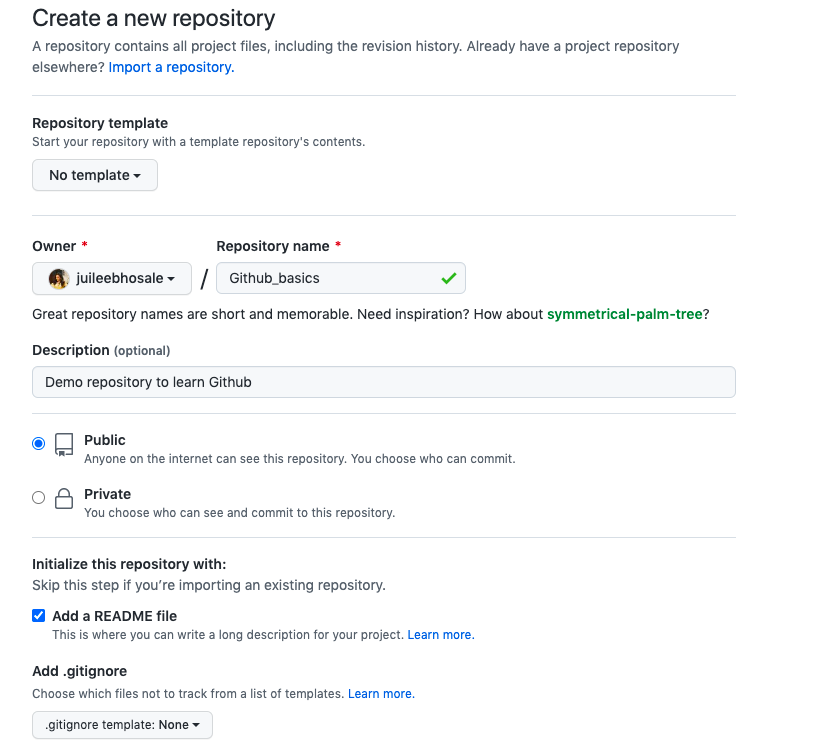
Give a suitable name to your repository. You can also check the create README file box which creates information text file for the repository
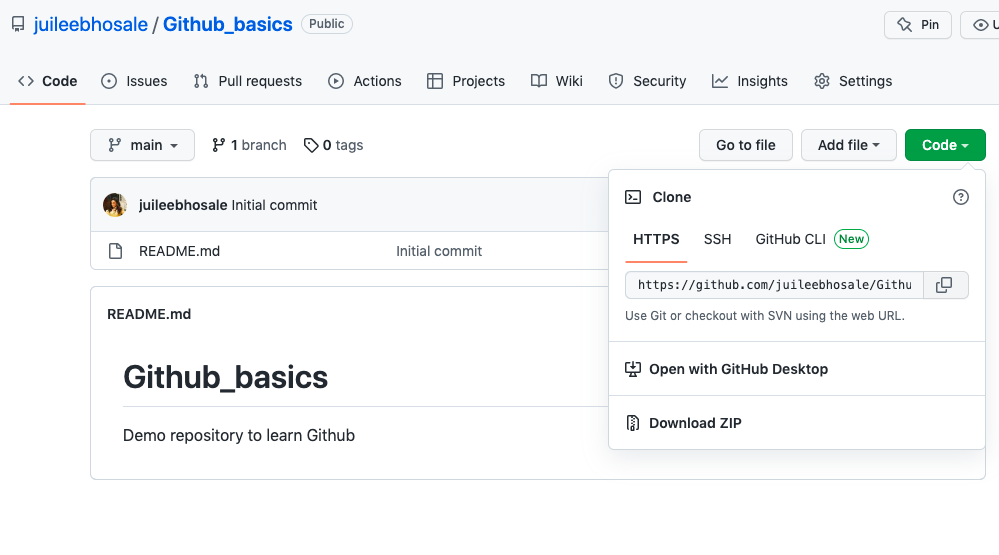
Next step is to create a clone repository in your local. To do this - open your online repository and click on the code button on the top right. Copy the HTTPS link.
Next open terminal (search cmd in Windows or terminal on MacOS) and type
git clone <copied https link>
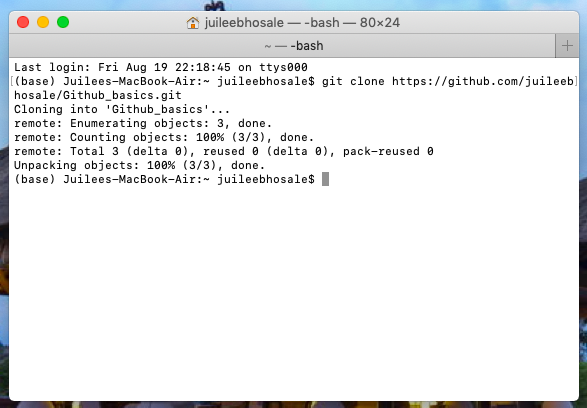
Your local repository has now been created and contains all files in your online repository. You can now code in your local and push changes to remote or vice versa. Remember local and remote repo are not automatically synced. We need to execute push pull commands to update them.
Push - Pull requests
Okay now that we have clone repositories created let's see how to actually use them. In this part we'll create a local file and "push" to remote. We'll also see how Github deals with files having conflicting code and ways to resolve conflicts
- First let's start by creating a code file in our local repository. You can create any code file or python text file as well. I'm starting with a simple text file for convenience. You can create a file without using shell commands. Here I use touch to create an empty text file
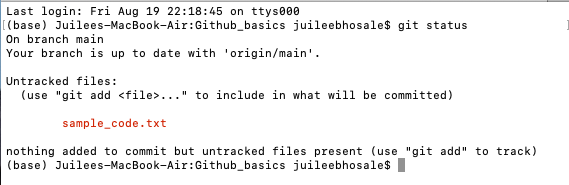
cd Github_basics
touch sample_code.txt
Use the 'ls' command to list all files in the git branch. It will now show two files (README and sample_code.txt) instead of one. Git status is another command that will show you how similar or different local and remote repositories are
git status
Typing git status after creating sample file will show one untracked file
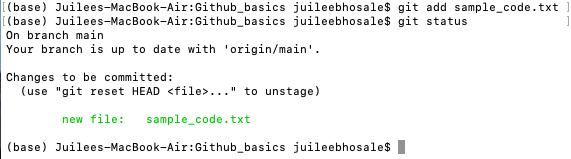
- Now let's push this untracked file to remote. To do this we first need to "add" this file to push, commit it and then push. Add simply tells terminal what and which files are to be queued to push to remote. Commit will commit or save any changes to the file and finally push will upload the file in its final stage to the remote repository
git add sample_code.txt
Typing git status after this shows that the new file is no longer untracked but added to queue
- Now let's finally push our changes to remote. The git push will push all queued files mentioned in git add to remote. Note in this case we didn't make any changes to the file in local and just pushed an empty file - but if were have done that we would have needed to use commit and then push
git push
Congratulations you have created your first Git repository and pushed a file from local to remote repository!